
Hey everyone!
Today I'm not talking about patterns exactly but rather about labeling your items. We all know that a watermark is essential for your photography work well so it's labeling your handmade items. Not only does it tell the client the materials and care instructions of the item, but it's a constant reminder of where the item came from.
My good friend Tanya Naser from HodgePodge Crochet created this awesome blog giving step by step instructions on how to make your own label for a minimal cost. Enjoy and make sure to show her some love and follow her =0)
http://hodgepodgecrochet.wordpress.com/
Adventures in Label Making!
For those of you that might not be aware, crocheters (or really anyone for that matter) who creates items designed for children are expected (by US law) to label them. The law actually went into effect August 14, 2009 and basically says:
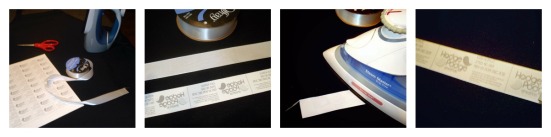
Now, a lot of people might look at that and shy away from it because basically–everything you make that is intended for young kids HAS to be labeled…and that can get expensive. But it really doesn’t have to be! If you have access to a printer, a graphic program (you can use paid ones like Photoshop or free ones like GIMP, or Sumopaint), some plain white ribbon, T-shirt transfer paper, and a hot iron–you’re set!
Start by opening your chosen graphics program. Create a new image as wide as your ribbon and as long as you want. In my case I decided on a fold-over, so I set mine to 1.5″ high by 4″ wide. Make sure you set your pixels per inch (ppi) to at least 300. That will give you a nice and crisp image for your label.
Once that is set, it’s time to design! Here is what mine looked like when I was finished.
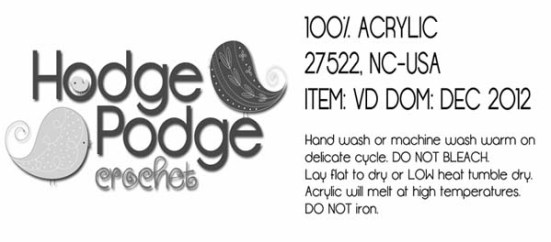 As you can see, I have my logo on one side and all the important info
on the other! You can go with color if you’d like but my printer
happened to be out when I went to print so I went grayscale. BUT, the
beauty part about designing your own labels is that you can edit them
whenever you need to and it’s relatively simple to do!
As you can see, I have my logo on one side and all the important info
on the other! You can go with color if you’d like but my printer
happened to be out when I went to print so I went grayscale. BUT, the
beauty part about designing your own labels is that you can edit them
whenever you need to and it’s relatively simple to do!
What you decide to put on your label is completely up to you but the main categories are:
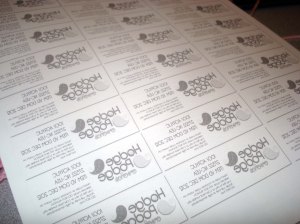 Now the fun part happens! All that is left is to cut out your labels and iron them onto the ribbon.
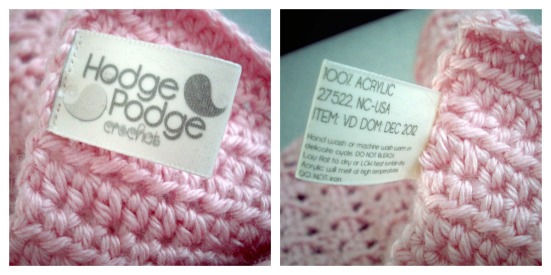
 When I finished cutting mine apart, I had adorable (and functional)
fold over labels that cost me practically pennies to make. And I had the
satisfaction of knowing that my finished project really was 100%
handmade by me!
When I finished cutting mine apart, I had adorable (and functional)
fold over labels that cost me practically pennies to make. And I had the
satisfaction of knowing that my finished project really was 100%
handmade by me!
 I was pretty thrilled that these labels were so simple to make. The
whole project took me about two hours (from the beginning of the design
to the actual sewing onto my garment), and I think they look absolutely
fabulous!
I was pretty thrilled that these labels were so simple to make. The
whole project took me about two hours (from the beginning of the design
to the actual sewing onto my garment), and I think they look absolutely
fabulous!
Today I'm not talking about patterns exactly but rather about labeling your items. We all know that a watermark is essential for your photography work well so it's labeling your handmade items. Not only does it tell the client the materials and care instructions of the item, but it's a constant reminder of where the item came from.
My good friend Tanya Naser from HodgePodge Crochet created this awesome blog giving step by step instructions on how to make your own label for a minimal cost. Enjoy and make sure to show her some love and follow her =0)
http://hodgepodgecrochet.wordpress.com/
Adventures in Label Making!
For those of you that might not be aware, crocheters (or really anyone for that matter) who creates items designed for children are expected (by US law) to label them. The law actually went into effect August 14, 2009 and basically says:
…manufacturers…have (to affix) a tracking label or other distinguishing permanent mark on any consumer product primarily intended for children twelve and younger. The tracking label must contain certain basic information, including the source of the product, the date of manufacture and more detailed information on the manufacturing process such as a batch or run number. The scope of this provision is quite broad in that it applies to all children’s products, including, but not limited to, items such as clothing or shoes not just toys and other regulated products.You can read more about the law here: Tracking Labels for Children’s Products
Now, a lot of people might look at that and shy away from it because basically–everything you make that is intended for young kids HAS to be labeled…and that can get expensive. But it really doesn’t have to be! If you have access to a printer, a graphic program (you can use paid ones like Photoshop or free ones like GIMP, or Sumopaint), some plain white ribbon, T-shirt transfer paper, and a hot iron–you’re set!
Start by opening your chosen graphics program. Create a new image as wide as your ribbon and as long as you want. In my case I decided on a fold-over, so I set mine to 1.5″ high by 4″ wide. Make sure you set your pixels per inch (ppi) to at least 300. That will give you a nice and crisp image for your label.
Once that is set, it’s time to design! Here is what mine looked like when I was finished.
What you decide to put on your label is completely up to you but the main categories are:
- Material (This includes what sort of yarn you used. If it’s a blend or a mix of yarns, add in each one along with the blend percentage.)
- Location (A zip code along with your city and country really is the way to go. It looks neater and doesn’t take up too much real estate!)
- Item (This is where you will have to get creative and start cataloging your items. For me, VD means dress with diaper cover.)
- DOM (Date of manufacture. This will be edited according to when your particular item was actually completed.)
- Care instructions. This part is NOT required but is a nice touch to add to your completed project. Most people who buy crochet items have no idea how to care for them properly so a little heads up helps extend the life of their handmade product.)

No comments:
Post a Comment